Mini Telecaster
 Mini Telecaster CAD sketch
I had this idea to make a Mini Telecaster by taking the neck from a Squier Mini Strat and modify the headstock into the distinct shape seen on Teles. I would have to make a new body and pickguard from scratch, which didn't scare me.
For a split second I thought it was probably a pretty original idea. Turns out, after a quick search online, a whole bunch of people have tried this exact thing before me. Some write-ups can be found on forums, such as tdpri.com.
First or not, here is a write-up about my experience designing and building a 3/4-size version of this iconic rock & roll machine. A Mini Telecaster Plan for this project is now available.
Design Goals
All projects should start with a set of design goals. Here is a somewhat scattered list for the Mini Telecaster. I have taken the liberty to use what I deem "a pinch of artistic freedom" to overcome some minor design hurdles.
The purpose with my projects has always been to find a path of limited resistance rather than get bogged down in minutia and tedious detail. This chosen path should help simplifying the process and making it more accessible to a broader audience.
If you're the kind of person that need every detail to be exact down to the famous "tele router hump" - have at it. However, be warned as my efforts, and templates will not include those details.
The goals:
- The player this mini tele is intended for is an adult, so low weight is negitiable
- Look like a Telecaster to those who casually know the shape
- Utilize a Squier Mini Strat neck with a reshaped headstock
- Make a new body and keep the size approximately proportional to the scale length (7/8 scale) and some dimensions borrowed from the Mini Strat
- Use good quality hardware, mostly Korean made, i.e. best bang for the buck
- Ash body for a classic look and feel with a transparent finish
- Be creative with the tone circuit. Spoiler alert: #1 killer of tone is your tone circuit.
Design
I started out drawing the body, neck and headstock in 2D CAD. The Squier Mini neck meets the body at the 14th fret, whereas on the full-size Tele (and most full-size electric guitars by the way) the neck meets the body at the 16th fret.
Most designs are compromises, and this is certainly no exception. The bridge location is fixed in relation to the neck. If I were to use a directly scaled down Tele body, the bridge would end up too far back on the body, and it would look weird.
In order to make it work, and still look OK, an extended tongue on the body was added jetting out under the heel of the neck. With this solution a standard neck plate can be used and there is no loss of structural integrity compared to the Mini Strat design.
The body thickness is only 1 1/2 inches in comparison to the full-size Tele, which is 1 3/4 inches. A standard jack cup may look over-sized, and I don't particularly care for it anyways. Instead I opted for a 2-screw jack-plate. The flat face on the body, where the jack cup normally sits, was eliminated. With a face mounted jack plate it serves no purpose.
Hardware
 Some of the hardware used for the mini Telecaster
I bought all the hardware from seller Bezdez on ebay. Bezdez sells decent quality hardware made in Korea. I'd say a notch or two above the average Chinese junk listed on fleabay. I've been very impressed with the quality and the service so far (a half dozen orders to date). So you know, Bezdez ships out of Canada, which may take a little longer than domestic. However, the quality, service and price more than make up for it.
All hardware for this guitar are chrome plated. I have a real problem with reworking plated components. The control cover plate may seem out of proportion, but I'd rather have a minor flaw in proportions than busting that chrome plating.
The bridge is a Wilkinson with compensating saddles. It's a really nice piece of kit and probably the most expensive hardware item. It comes with holes for both top-load or Through-body strings. I'm going with top load.
Since I'll be messing with the peghead anyways, I'm planning on changing out the tuners while I'm at it. However, truth be told, while the original tuners feel cheap, they work just fine. If I had to do it over I probably would have left them in place.
Electronics
Some electronics were purchased from Bezdez along with the hardware, such as the pickups and three-way switch. The rest of the components, such as potentiometers, jack and capacitors for the tone control, I usually buy from Mouser Electronics.
The tone circuit will be a 4-position rotary switch. It will be connected such that there will be one bypass and three different capacitors.
Building the Mini Telecaster
Here is how I built the mini Telecaster. Some info that is more general in nature or that goes into great depth has been linked to separate pages.
Guitar Templates
- General information about how to make and work with Guitar Templates
- Making a perfect Neck Pocket Template
- Guitar Template Downloads (coming soon)
The Neck
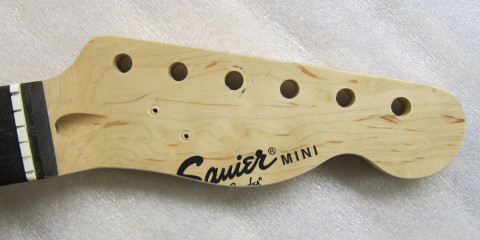
Shaping the Headstock
Click the link above to see how to modify a Mini Strat headstock (aka peghead) into a Telecaster shape.
Plugging Holes
Various holes were plugged in the neck. I find it much easier to plug the existing mounting holes and drill new than to line up to the existing holes. Besides, I'm amazed how crooked most hole patterns are in these inexpensive guitars.
Since I was also going to replace the tuners, I had to plug the holes for the tuner mounting screws.
Replacing the Tuning Machines
Replacing the original tuning machines with a set of Gotoh Minis.
The Body
 The mini telecaster body has been routed.
The body is made of single slab of Ash. Since it wasn't meant to be a kid guitar despite the short scale, I made it from regular old ash, not swamp ash. As a result it weighs in at about 7 1/2 lb. Incidentally, that is the average weight of a full-size tele. I bought the body blank from ebay seller ClassicToneWoods. It's the highest quality body blanks I've ever seen. They will thickness the body blanks you buy from them, to any thickness, free of charge. An excellent service since most of us don't have access to industrial planers and surface sanders.
Edge radius
After the body was cut out and trimmed to size using a router and a guitar template, an 1/8" round-over bit was used on both front and back to round off the edges.
Neck Pocket
So far I have not seen a better way to make a neck pocket template for a perfect fit. Follow the link to learn how I did it.
Finishing
I've always struggled with good finishes. Either that, or my standards are just too darn high. Since the body was made from a near perfect piece of ash, it only made sense to go with a transparent finish to show the wood grain.
That said, for this guitar I contemplated either the translucent Butterscotch Blonde or the Crimson Red Transparent. I ended up going with the red.
The finish schedule was as follows:
- Finish sanding to 300 grit
- Grain fill
- Stain with Trans Tint Bright Red
- Cellulose lacquer seal coat
- Finish coats
Pickguard, aka Scratch plate
Here is how the pickguard was made. The way I do it, it turns into an iterative process with making the body
Installing Electronics
To be honest, I'm still working on a circuit I'm happy with. Wiring a regular volume and tone is easy-peasy. I wanted a rotary switch in place of the customary tone knob with preset filters. So far I have experimented but not come up with anything I like. I will update this section once I've found what I'm looking for.
Assembly and Setup
The setup turned out to be really easy. I put 12s on it and set the intonation. Shorter scale length require heavier gauge strings to maintain the same tactile feel as a longer scale instrument. For that reason I would recommend 11s. in this case I'm planning on using the guitar for slide and open tuning, hence the heavier gauge. I did have to open the nut slots slightly.
The Finished Result
 Frontal view of the Mini Telecaster Frontal view of the Mini Telecaster |
 Back of the Mini Telecaster Back of the Mini Telecaster |
 Headstock of the Mini Telecaster
 This is the output jack and closeup of the finish
Conclusion
This project was a lot of fun, even though I struggled some with the finish. I should also mention that the finished weight is 7 1/2 pounds (3.4kg), which coincidentally is the average weight of a full-size Telecaster. Since it is scaled down, I would have assumed it would have been lighter. The reason is in the body blank used. This ain't no swamp ash, but the real deal, and I have the shoulder callus to prove it.
All kidding aside, 7 1/2 pounds isn't bad, but not a kid's guitar any longer. If you want to build this guitar for a junior player, make sure you use lighter wood, such as Swamp Ash, Alder, Cedar or Pine.
Recent Articles
-
Speaker Plans
Feb 04, 18 05:23 PM
 Speaker plans for download - free pdfs for DIY builders and tire kickers