The Mini Jagmaster
 Mini Jagmaster CAD sketch
The idea of the mini Jagmaster was hatched after seeing a picture at the ShortScale Forum of a Fender Musicmaster clone someone had built using a Squire Mini neck.
I have long been a fan of the Jazzmaster body shape, but not too excited about some of its appointments, such as the overly complicated controls and the usual 25.5" Fender scale length. The Squier Jagmaster is a lot closer to what I was after, so after finishing the mini Telecaster, this turned into my next project.
Design Goals
Heavily inspired by a Jagmaster, here are the specs for this mini version:
- 22.75" scale length Squier Mini neck
- Solid wood body
- Two pickups
- Simple electronics: pickup selector switch, one volume and one tone knob
- Top-loaded Hardtail bridge for simplicity
Design
This is not a difficult conversion from a Squier Mini if you've made guitar bodies before. There is no modification to the neck, and most of the hardware can be taken off the donor guitar, if it is available. The basic size and feel of the body isn't all that different from the Mini Strat either, except it looks so much cooler!
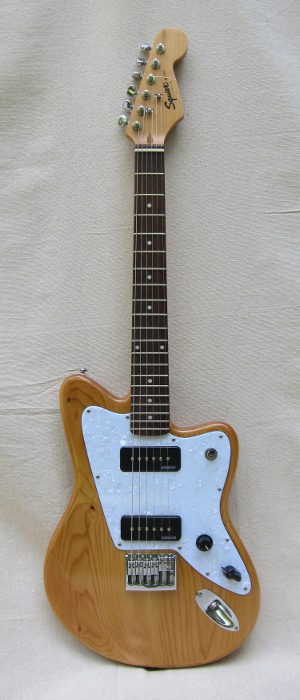
I drew up the body shape on CAD and went to town. I wasn't thrilled with the shape of the Jagmaster's pickguard, especially the section at the upper horn. I paired it down just a tad to show off more of the body for better visual balance.
I also opted for a Strat-style boat jack plate. I had one in my parts box, but it could just as well have been salvaged from the donor guitar. The jack itself need replacement for a more reliable Switchcraft brand.
Hardware
I was going to use the bridge off the Squier, but I had another top loaded hardtail laying around in the scrap bin, so that's what I used. Functionally, the Squier bridge would have been just fine.
Electronics
I like simple controls. This guitar has a pickup selector switch, a tone and a volume. Just like the Mini Tele I just finished, this guitar is a contender for a Gibson Varitone-type circuit down the road.
I was originally going to use mini humbuckers, but opted for a pair of P90 soapbar pickups. The P90s are the inexpensive Wilkinsons with ceramic magnets.
Building the Mini Jagmaster
The Neck
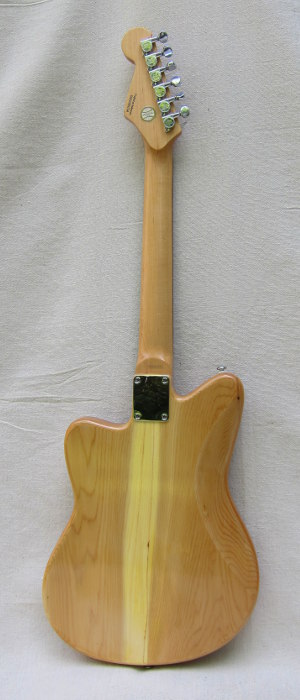
Very little work was put into the neck. I filled the existing mounting holes and changed out the tuners to a set of Mini Gotohs - not because it needed them, but I had them at hand.
The Body
 The two-piece Eastern White Cedar Body blank for the Mini Jagmaster
Body Blank
The body blank is a two-piece Eastern White Cedar. I had never worked with this lumber before, but it quickly became one of my favorites. It is light weight and cuts like butter with a pleasant fragrance. Working with it resembles Alder to a point, but is lighter weight and softer.
The blank has to be at least 16 3/4 x 12 1/4 x 1 1/2. The body blank I used was bigger, and slightly thicker at 1 5/8". The only slight concern going thicker is that the neck screws will have less engagement in the neck, but it's not really an issue.
Cedar chips relatively easily, resulting in tear-out if you're not careful. By using sharp bits, taking shallow cuts and feeding the wood slowly at sensitive areas the risk can be mitigated.
Cedar is also sensitive to dings and scratches. It doesn't really bother me as I figured if it turns out to be a keeper, relicing will take care of itself.
Guitar Templates
To shape the body, you need a template. The method I use is the same on all guitars I build. Click on the link above for more detail (will open in a new window).
Neck Pocket
 Dry-fitting the neck
The neck pocket was routed out with a template made the same way as for the Mini Telecaster. It's by far the best way to make an accurate neck pocket. Follow the link above to learn how I did it.
Finishing
The finish on this guitar is a little different than anything else I've done. The Cedar I used is very light and very soft. To overcome the softness I opted to seal the wood with CA glue.
It worked out OK, but was pretty unpleasant while in the thick of it. CA glue develops a lot of heat when used in high quantities. It got so hot my vinyl gloves melted. Being a glue, it also sticks to everything so is hard to apply.
Over the CA I sprayed several coats of shellac and several top coats of Nitrocellulose Lacquer. I like my finish as thin as I can get away with.
Pickguard/Scratch Plate
The pickguard was made from a three ply pearloid I bought of ebay. The method to shape it is the same as I used for the tele by first making a hardboard pickguard template.
Pearloid is one of those materials that just screams "man-made". It's called Mother-of-Toilet-seat for a reason. The attraction in using it is the contrast it presents next to the clear finished Cedar.
Installing Electronics
Before wiring a guitar the cavity has to be shielded and strings grounded.
The hardware that comes with most cheap P90 pickups are junk. I ended up buying replacement screws off ebay with the correct head shape.
These pickups are advertised as 8.5/9.2k, which is nowhere close to what I measured. Expect the impedance to be closer to 7-8k, and no meaningful difference between bridge and neck pickups. One good thing though, the pole spacing is different between the two pickups, so at least they look right.
Assembly and Setup
 Mini Jagmaster neck joint detail. Can't even slide a sheet of paper between the neck and body - anywhere!
The assembly and setup posed no surprises, really. The setup is as you'd expect on a Squier mini. I put 11-gauge strings on this guitar. I think 11s is probably the lightest strings I'd put on a guitar with this short scale length.
The Finished Result
 |
 |

Conclusions
I'm very happy with the way the Mini Jagmaster turned out. It is very light weight - probably just under seven pounds, which is part of the reason it is so hard to put down. The tone from the P90s are amazing, especially played through a small tube amp. I'm an even bigger fan of P90s than I used to be, even the cheap ones.
During this project I also learned how important proper shielding is, and how much impact it has on the hum. Once done correctly, you couldn't tell this guitar had single coil pickups.
Recent Articles
-
Speaker Plans
Feb 04, 18 05:23 PM
 Speaker plans for download - free pdfs for DIY builders and tire kickers
AudioTinker › Mini Jagmaster